

Understanding Socket io
socket io is javascript library that provides a simple interface to manage the web socket connections.


Introduction
Socket io is a library built on top of the web sockets technology that gives a simplified interface to manage the web sockets between client and server .
In this tutorial we will understand what is a web socket and how socket io helps us in very simple and intuitive way that makes sense to you.
Web sockets
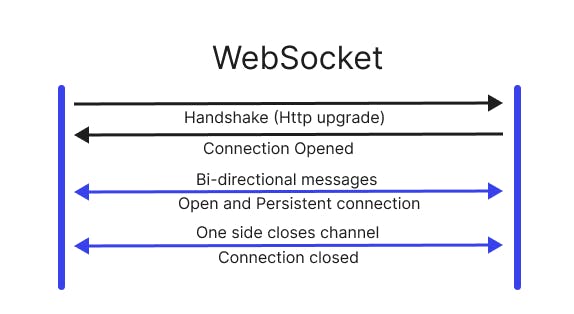
A web socket is a duplex protocol that is different than Http built for creating communication channels between client and server in which there is bi-directional communication between client and server through out the connection and once the connection is broken then the the client cant communicate with the server.
The connection that is developed using web socket lasts as long as any one of the participants lays it off. Once one party breaks the connection, the second party won’t be able to communicate as the connection breaks automatically at its front.
Web sockets are not built on top of Http but it requires the http to initiate connections between the participants and server.
Why Use Web Sockets instead of http?
The http connections are closed once after the response to the client request is completed , this may be ok for normal applications where there would be no real time data that will be used in them. But when we have applications that need real time data like a chat app we may need to do a request for single message that user sends.
Doing requests for every small message that user sends cost us a lot of time , but we are using we sockets and created a bi directional connection between server and client then we will just connect once and send all changes when they happened from client and send it server without any time wastage and we will close the connection once the client closed his browser or want to disconnect from the server.
For example , sending fetch() requests 20 times one by one would take a much time than using the web sockets to deliver those 20 requests to the server.
What is Socket io Then?
socket io is a library built on top of the web sockets technology , it gives a simple interface to manage and create web socket connections with clients. we can build all the logic from scratch using only web sockets api but as a developer we want to have simple interface that takes care of all mechanics and gives us much more time to build our application logic.
Now lets understand how socket io works by building a small chat application because web sockets and socket io are really good for these type of real time applications.
I have already uploaded the code for the sample project we are building in my github , you can check the code if you have any doubts. github link
So now lets dive into socket io
Socket io In Action
- In order to use socket io we need to install a npm package in server side and a socket io client on our front end side. For the server side we need to install socket.io package by
npm i socket.io
- for using socket io on client side we need to import the package we can do that by using the cdn of socket.io
 // Client side js file

 import { io } from "https://cdn.socket.io/4.3.2/socket.io.esm.min.js";
Main crux of socket io
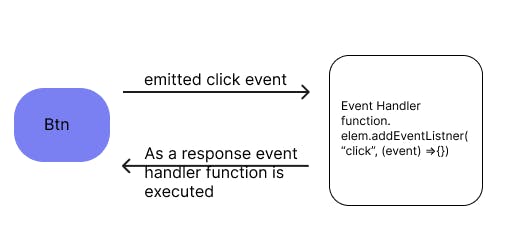
We all know about event listeners in javascript , where the event will occur like a click event on a button and we will have event listeners setup on that element which will have a event handler function that will be executed every time that event occurred.
For example , if form button is clicked then we have a handler function that will do validation of inputs and then send the data to the server.
Socket io is primarily built on the concepts of events will happen and event listeners handle them but on a different level , In socket io server can have event listeners setup for events that will be fired from client and also client can have event listeners setup on its side to handle the events that will be fired from the server.
Server can have event listeners to handle events that are fired from client.
Client can have event listeners to handle events that are fired from server.

Both server and client can have bunch of event listeners to handle the fired events and can emit or fire events to other side.
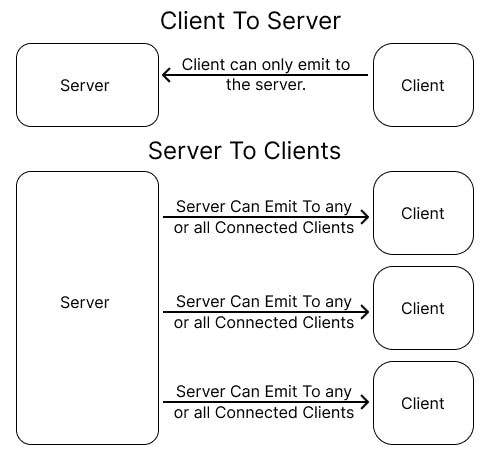
The client can only emit or fire events to the server and not any others.
The server can emit events to any connected client or all connected clients.
So many connected clients can emit events to server so server does also need to handle those and it does by event listeners and event handler functions.
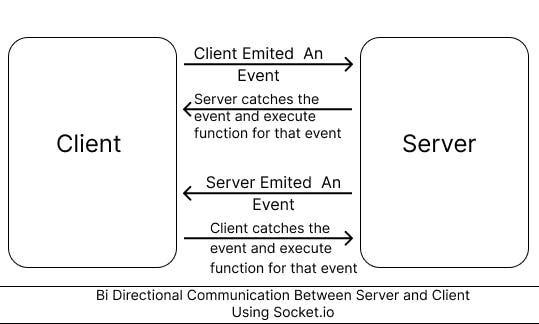
- From the picture we can see the bi-directional communication between server and client back and fro using the events and event listeners concepts , this is how the socket io work at its core this is how the bi-directional communication happens in web sockets using socket io .
Example - Socket io For Chat App
From now we will learn the concepts of socket io by building a example chat app by using socket io
step-1 : Initialization On Server
we will need to have node js installed on our system. we can build the server with just socket io but in many cases you are going to build the server in combination with express js . so we will be using express js to build our server.
create a new folder and install required packages
$ mkdir socket.io-example
cd socket.io-example
npm install socket.io express
- Setup the server and import the required packages.
const app = require("express")();
const http = require("http").createServer(app);
const io = require("socket.io")(http);
- This will setup the server to listen on port 3000.
http.listen(3000, () => console.log("listening on http://localhost:3000")
- Now , we are going add all the socket io things to our code all the socket io should go before the http.listen() function.
// package imports

// socket.io code here

// http.listen()
step-2 : Listening To Events
We can do something right after some client connected to the server by using the builtin event called "connection" given by socket io itself for us. we can do that by io variable that we used to initiate the socket io because it will be now our sockets manager , it will manage everything for us.
// package imports

io.on("connection" , (socket) => {
    console.log(socket.id)
})

// http.listen()
io.on() this is the method that is used to create event listeners which are responsible for handling the emitted events from client . io.on() takes two arguments one is the event name and the other is a function to execute when that event happened.
The socket instance will be available for us in that event because it is the first connection that client made and we can have the socket obj of that client and this socket object will contain some details about the client like unique id of the client and some methods.
builtin events vs custom events
There are some builtin events given by socket io like an event that emitted when connection happened "connection" event or "disconnect" event when client disconnected. There are more builtin events like that refer to the original docs of socket io here socket io events docs
But majorly we want to have custom event names with which we can emit and listen to them , we can have that custom event names anything in the builtin event name is a custom event name. the builtin events are for only some events that we cant keep track of directly like connecting and disconnecting.
io.on("any custom event name here",()=>{})
Now lets build event listeners for custom events , there event listeners will only be executed if the event is emitted from client with the same name . But we need to attach those event listeners to the socket instance because those event listeners will only execute if the event is emitted from that socket client only. The event listeners on io object are global to all clients.
The socket instance will only be available on "connection" event handler function as an argument given by socket io. we can store it some global variable or write the code in the function itself , storing it globally is not an option because we only want to attach those after the client is connected and not before , so we will write our code inside the function.
io.on("connection", (socket) =>{
    socket.on("event-one" , () =>{})
    socket.on("event-two" , () =>{})
    socket.on("event-three" , () =>{})
})
we can do what ever we want on those event handler functions and they can also access the socket instance of the client. now we completed basic setup on server , now we will go to client side js and will progressively build the chat app.
Lets write a basic event handler with event name "hello"
io.on("connection" ,(socket) =>{
    socket.on("hello", (payload)=>{
        console.log(payload)
    })
})
- payload is the data that is coming from client , it is sent to the server with event as a data needed or produced or something related to that event. this is how the data is transferred from one side to other side.
step-3 : Initialization On Client
You can build your frontend with any framework but i will be building this sample project with plain javascript. we have will have some boilerplate on the project like ui and css and basic click handlers like that we don't discuss that now but a look at the sample app source code. now we will be writing only the socket io code part in the js file.
Importing socket io from cdn.
import { io } from "https://cdn.socket.io/4.3.2/socket.io.esm.min.js";
- Next connecting to the server with using socket io
const socket = io("http://localhost:3000/")
- The socket variable will be storing the connection data of the socket. Now we can start emitting events to the server but we need to make sure to emit the events only after the connection is made with server , you can do that by keeping these two points in mind when writing the client side socket io code .
If there are events that are needed to be emitted at the start or just after the connection is made then we can use builtin event "connect" on the socket variable.
Emitting events after some operations in the app would be much easier because we are going to emit the events from a function which may be triggered by some other things like click listeners etc.. after some time or after some thing ocurred . Even at that time you should make sure that connection is made to server or not.
- Now let's emit event with name "hello" to the server, we can do that by using emit() method on the socket , it will take event name and payload as arguments and those will be part of emitted event.
socket.on("connect", ()=>{
    socket.emit("hello", "hello from the client")
})
- We can also emit events when a button clicked , for example
element.addEventListner("click", (event) =>{
    socket.emit("event-name", event.value)
})
step-3 : Emitting Events From Server To Client
So far we have only seen how to listen to events but we can also emit events to one client or to all connected clients.
Events can be emitted from the express middleware functions also and not just from io.on("connection") , in this case all of the socket io code should be there before the express routes and controllers are written and we need to the get the socket instance for every every request may be using a helper function.
// socket io

// express routes and controllers for those routes
- server.js
io.on("connection" ,(socket) =>{
    socket.on("hello", (payload)=>{
        console.log(payload)
    })

    socket.emit("event-name", payload);
})
- Client should have a connecting listener for that event name on its side
// client side js file

socket.on("connection" , () =>{
    socket.on("event-name" , ()=> {})
})
The client should have listeners for that event that is being emitted set up in client side js code. There should be listeners setup for event that will be emitted on the other side.
There is some good practices we have to follow on both server side and client side
- All the event listeners on the server side should be declared inside the "connection" event handler function.
io.on("connection" , (socket) =>{
    // all the server side event listeners
    socket.on("for event one",(p) =>{} )
    socket.on("for event two", (p) =>{} )
    socket.on("for event three",(p) =>{} )
})
- All the event listeners on the client side should be declared inside the "connect" event handler function.
socket.on("connect" ,() =>{
    // all the client side event listeners
    socket.on("for event one",(p) =>{} )
    socket.on("for event two", (p) =>{} )
    socket.on("for event three",(p) =>{} )
})
step-4 : Lets Write Some Code For Our Chat App
Enough for conceptual understanding lets write some event listeners and event emitters on both sides , now we will write
An event listener on client that will catch the event "new-message" event and display it in the chat.
An event listener that catches the event "new-user-joined" on the client and displays a message "new user joined" in chat box.
An event listener that catches the event "user-disconnected" and displays a message on the chat box.
An event emitter on server that will emit a "new-message" to the client it will be emitted when there is new message in chat.
An event emitter that emits the event "new-user-joined" from server to client whenever the new user joined the chat.
An event emittor on server that emits event "user-disconnected" to the client when the other users disconnects from the socket connection with server.
An event listener to catch the event "new-message" on the client.
// client js
socket.on("newMsg", (payload) => {
    addMessageToChat(payload);
});
- An event listner for "new-user-joined" on client
// client js
socket.on("new-user-joined", (payload) =>{
    addMessageToChat({
        userName : payload.userName,
        msg : "New User Joined"
    });
})
- An event listener on client "user-disconnected" on client
// client js
socket.on("user-disconnected", (payload) =>{
    addMessageToChat(payload);
})
For 4, 5, 6 we need an other concept called broadcasting events to clients.
Broadcasting Events To Clients
Broadcasting of events is emitting an event to a subset of clients or all clients. Broadcasting events is a complete server side thing and clients just will get an event from server as normal but on server side the event will be emitted to subset or all clients.
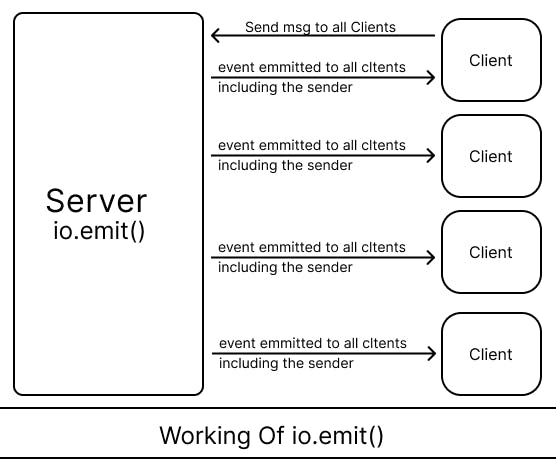
broadcasting events to all clients can be accomplished using the io variable on server and it will emit events to all connected clients . io variable will have data about all connected clients because it is our manager for us.
    // server js

    io.emit("event" , payload)

    // the client would get it as just normal emits from server.
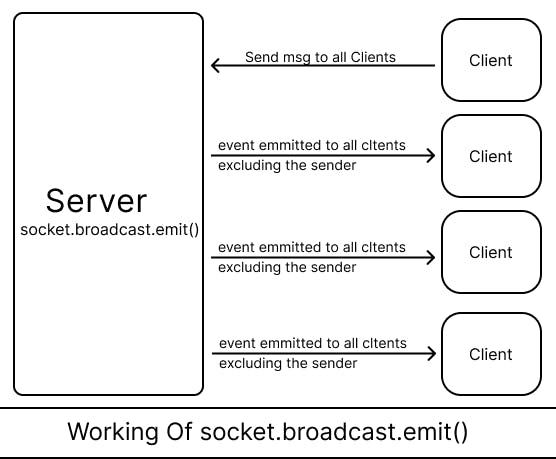
It is good if we want to broadcast events to all connected clients but what is we want to broadcast the event to all clients except the one socket the broadcasting of event started on. That we means if we broadcast an event by using a method on socket then the broadcasted event will be sent to all clients except the client that started it.
    io.on("connection" , (socket) =>{
        socket.broadcast.emit("event", payload)
    })
The usual flow for broadcasting would like this with an example
Client will types his message in input box and press send button , the event will be fired to server called as "new-message".
Server will catch the event with event listener and in that event handler function we will broadcast the message using the method on that socket.
Now the event will be sent to all clients except the one that started it.
Emit an event "new-message" to all clients except the sender socket that sent it.
// server js inside io.on("connection")
socket.on("newMsg", (payload) => {
    socket.broadcast.emit("newMsg", payload);
});
- Broadcast en event to all the clients for the clients that is saying that a new user joined the chat.
// server js inside io.on("connection")
io.on("connection", (socket) => {
  socket.broadcast.emit("new-user-joined", {
    userName: socket.id,
  });
})
- Same as 4 , now we need to emit an event to all clients when a user disconnected except the one that is dis connected. "disconnect" is a builtin event that will be emitted when a socket is disconnected with server.
// server js inside io.on("connection")
socket.on("disconnect", () => {
    socket.broadcast.emit("userDisconnect", {
      userName: socket.id,
      msg: "user disconnected",
    });
});
- Until we have seen how to emit events to all clients but there is more when it comes to emitting events from server
Emit event to one client that is carrying a message of client that want to send it. (sort of private messages , one to one communication between socket using server as middleman).
Emit event to the particular subset of sockets. (sort of groups , group members are sockets and event can be emitted to all sockets in group)
We will see the above two points in next step step-4.
step-4 : Rooms In Socket io
Rooms are purely a server side concept and clients don't involve with it and clients don't know which rooms that they are in on its side.
One To One Socket Communication
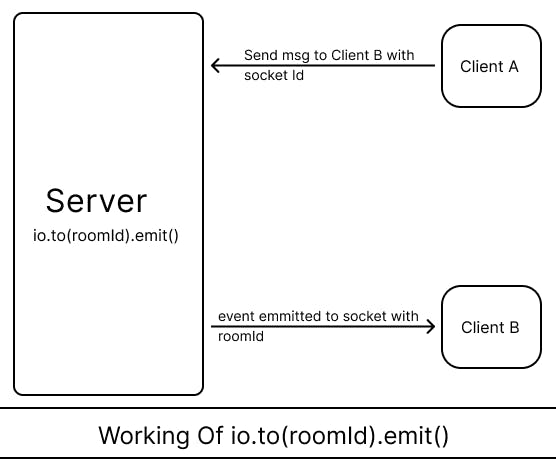
- we can send data directly from one socket to other socket using as server as a middle man. we can do that by using to() on io.
    // server js inside io.on("connection")

    io.to(SocketId).emit("event", () =>{})
The to() method will emit the event to the socket by using its socket id which you can find with socket.id on socket obj.
We chain the emit() method on to() , this makes the socket io code meaning full when reading the line from start to end.
- The flow of one to one socket communication would usually looks like this lets assume Socket A is sender and Socket B is receiver
Get the socket id of socket B somehow , Now socket A will will emit a new event to the server with the data to carry and the an identifier of socket B.
Server will catch the event and will identify the socket id of the socket b using the unique identifier and will emit the event to the socket b.
Socket B will get it as normal event from server , so you should have data that says it is a private message from a sender socket A.
Socket B will catch the event and handle it.
Back to Our Chat App
I am doing it only for practise and in production you should update the user 's socket id at every new connection of user.
Lets store all the user Id's in array when they are connected at first and use it as source of socket id's.
Create an event listener for "send-private-msg" on the server and in it randomly select the user id and emit the event "got-private-msg" to that socket.
On client emit an event "send-private-msg" that will send the data/message to the other socket. and create event listener for "got-private-listner" to handle any private messages.
// server js
let users = [];

io.on("connection" , (socket) =>{
    users.push(socket.id);
    socket.on("send-private-msg",(payload) =>{
        io.to(users[1]).emit("got-private-msg", payload)
    })
})
// client js

button.addEventListner("click", (event) =>{
    // construct a payload and send it
    socket.emit("send-private-msg", {})
})


// event listener for "got-private-msg"

socket.on("got-private-msg", (payload) =>{
    // do something with that payload display it on the private message board with name linked.
})
Concept Of Rooms In Socket io
A room is just an arbitrary channel that sockets can join and leave. It can be used to broadcast events to a subset of clients. Like broadcast an event to all sockets in that room. Rooms are purely server only concept and client does not have access to list of rooms it joined etc..
By default at the time of initialization of a socket for a client a room will be created with id that is equivalent to the socket id and in that room the socket will only be there. The one to one communication that we have seen before is just communication between two rooms . we have seen how to broadcast an event to the room without knowing it.
The to() method worked with socket id is because it is same as the room id for that room.
So by default each socket will have its own room and it is the socket that is there in that room , so when broadcasting an event using to() across two rooms is just sending directly emit event from one socket in one room to their socket in other room. For example Now we have command to broadcast an event from event from room A to room B in case of one to one communication and lets exactly see what happens
we will ask the socket io to broadcast the event to the given room except the socket that command is originated from.
Socket io will send now emit the event all the sockets in that room , in our case we will only have one so the event will be emitted to that socket only.
- The sockets need to join a room explicitly to join rooms other than its default room.
// server js inside io.on("connection") and inside any event handler that joins a socket into a room

socket.join("some room name")
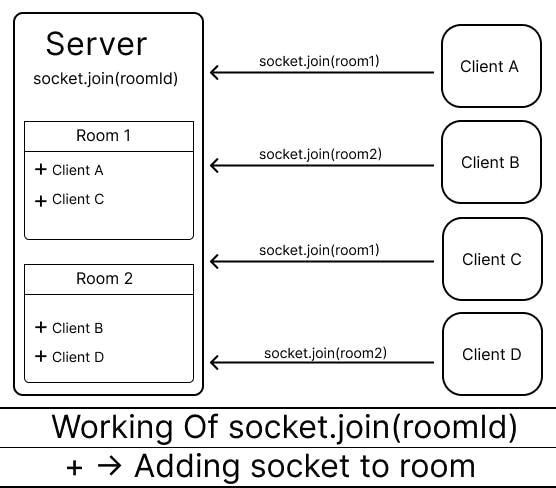
- The join takes the argument, it is the name of the room that socket want to join, we can make socket A join into the default room of socket B but it makes you confused . so it is better to always create a new room and then join all the sockets into it
Always create a new room with a some name or with some unique identifier of your own and then join all the sockets into it.
A socket can be in multiple rooms at a time and it can receive all events emitted for those room member sockets from server.
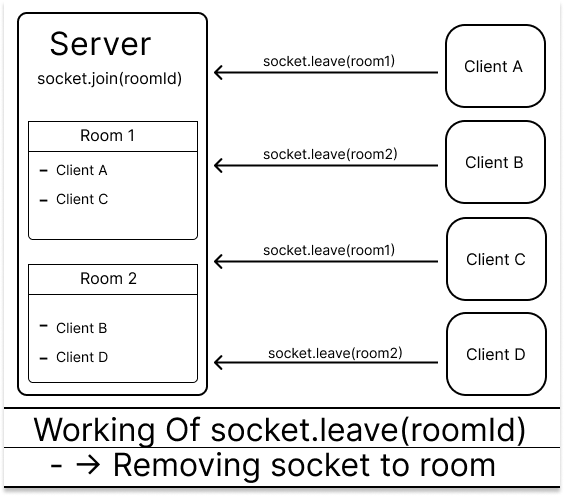
As you joined explicitly into a room you need to also explicitly leave a room if u want to leave a room and don't want any events emitted to you from that room. you can use leave(roomId) method.
// server js inside io.on("connection") and inside some event handler that handles the event of leave a group

socket.leave(roomName)
- Now you joined some room and you want to send a message to all room members, you can do that by
// server js inside io.on("connection") and inside some event handler that handles the event of sending messages to room.
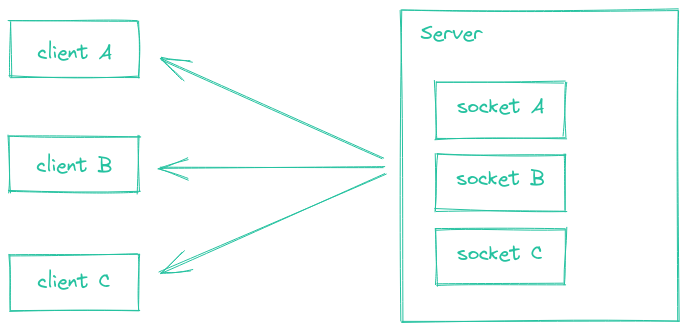
// emit event to all sockets in that room regardless of who sent it.
io.to("room name").emit("event", payload)
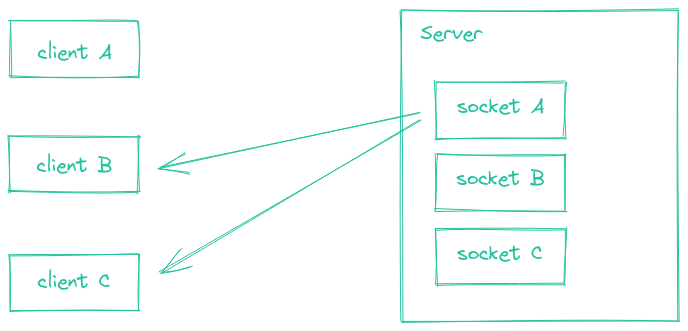
// emit event to all sockets except the sender socket ,use the socket instance inside io.on("soonection").
socket.to("room name").emit("event", payload)
// to all clients in room1 and/or room2 except the sender
socket.to(["room1", "room2"]).emit(/* ... */);
- broadcasting events using io and the picture is taken from socket io official docs.
- broadcasting events using socket instance and the picture is taken from socket io official docs.
Here is the emit cheat sheet from socket.io official docs itself emit cheatsheet.
Practise with all of these rooms and emitting events to room , you will only understand it when you practised it. Use this tutorial code as a base and build the rooms upon it. github link
step-5 : Good To Know Features
Executing functions on client side from server
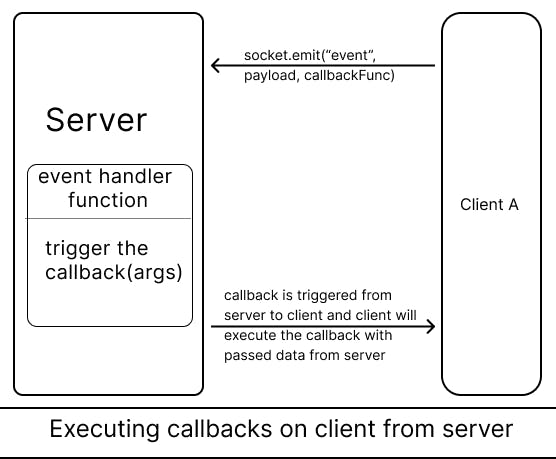
We can execute a function on client side from server , the benefit of this is we can process something on server and then trigger the function on client with some data , in this way the this feature is very useful.
We can only execute client side code from server but we cannot execute the server side code from client because that can cause pretty serious security issues.
Now we will see how to execute client side code from server.
    // client js

    const execFunc = (dataFromServer) =>{
        // do somethin g with that data from server
    }
    socket.emit("event", payload ,execFunc)
    // server js event handler isnide io.on("connection")

    socket.on("event", (payload, callback) =>{
         // do all of the processing or do some things before calling the callback on the client.

         callback(dataToClient)
    })
- The diagrammatic view of above code
Admin Ui Of Socket io
Socket io provides a admin ui for your socket server to observe how your server is performing or how many connections are made and how many connections are live. But there is little bit of setup on server.
install the package from socket io and the name is "@socket.io/admin-ui" and it is used to help connect the server with adin ui which is hosted by socket.io itself.
npm i @socket.io/admin-ui
- initializing the "instrument" method from the package that will create an option for us to securely connect to the server with admin ui by implementing the authentication on server and that authentication will be needed in order to connect to the server.
    // server js
    const app = require("express")();
    const http = require("http").createServer(app);
    const { instrument } = require("@socket.io/admin-ui");

    const io = require("socket.io")(http, {
      cors: {
        origin: "*",
        credentials: true,
      },
    });

    instrument(io, {
      auth: {
        type: "basic",
        username: "some user name here",
        password: "some super long secrete password here"
      },
    });

    httpServer.listen(3000);
Now go to link admin.socket.io which is the hosted version of admin ui from socket io and enter your credentials and that't it now you are in the admin dashboard of your socket io server.
I have not covered in detail about admin ui , use the socket io official docs to learn more about admin ui admin ui docs.
Wrapping up
Oof, we are done! I know that there are many concepts that we have learned in socket io but these are purposefully put in here because if a learner need to understand and get a good grasp of the concept he/she should play and practise on it more time .
It took me time to put everything together, and you don’t have to understand everything at once at first go but to take time practise and revisit when you are having any doubt. One reading will give you a good overview of all the functionalities and the concept of socket io , but you may need to read the article more than once and focus on building each functionality on your own by understanding the steps to grasp all the concepts.
Before I end, Please feel free to reach me out and ask any doubt you are having i am more than happy to explain to you. If you are having any feedback about article i would love hear that and improve the my tutorial.
My twitter handle is twitter.com/gowtham_uj , feel free to DM me.
My email is gowthamujjineni@gmail.com , feel free to reach me out.